What it does
1.0LevelAutoSet in detail.
- 01
Rule for the lower and the upper level: the closest, the first above, the first below or none.
- 02
Works with walls, floors, columns, building services and families.
- 03
Leaves out walls with an edited profile and attached columns.
- 04
Level filter by name or regular expression; hides levels that are not building storeys or structural.
- 05
Report at the end.
How it works
2.0LevelAutoSet in four steps.
- 01
Select the elements and open the tool.
- 02
Tick the levels that can be assigned.
- 03
Choose the rule below and above (Closer, the nearest, is the usual one).
- 04
Press Set Level: each element gets its level without moving.
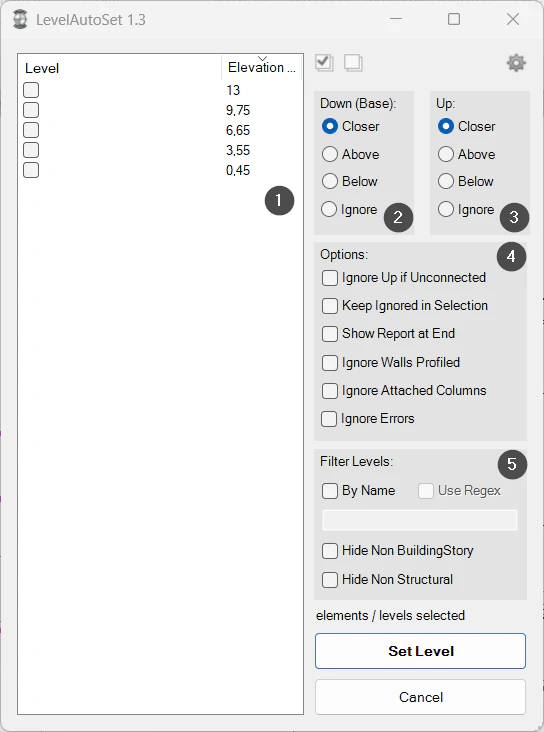
On screen
The Level AutoSet window.
- 1Project levels with their elevation.
- 2Rule for the lower level.
- 3Rule for the upper level.
- 4Options (ignore unconnected, profiled walls, attached columns…).
- 5Level filter.
Screenshot from the user guide, which comes with the licence.
A use case
Give walls modelled without their storey their level: the closest above and below, ignoring the top if it is unattached.
More tools
3.0More productivity tools from the same group.
- FilterMoreAdvanced filter with extended capabilities and selection memory. Refines complex selections in large-scale projects.
- PreFilterLets you preselect the categories to filter before making the selection. Part of FilterMore.
- SelectionExpanderExpands the current selection in several ways: by type, category, host or relationships. Part of FilterMore.
- FilterByParameterFilters elements based on specific parameter values. Part of FilterMore.
- FilterByWarningsSorts the model's warnings by type and category and selects the elements involved. Part of FilterMore.
Want it for your team?