What it does
1.0ExcelSync in detail.
- 01
Elements: selection, view or the whole model; visible types, all types or those in use.
- 02
Creates the table from a selection or from a schedule.
- 03
Synchronises by GUID or by name, adding or removing rows.
- 04
Protects Excel formulas and can change or rename families and types.
- 05
All parameters or only those in a list.
How it works
2.0ExcelSync in four steps.
- 01
Open the Excel workbook and choose the table (Get from Active Excel Sheet).
- 02
Choose the Revit elements or types.
- 03
Create the table or set how to sync (by GUID or by name) and which parameters.
- 04
Press Sync to Excel to export or Sync to Revit to bring the changes back into the model.
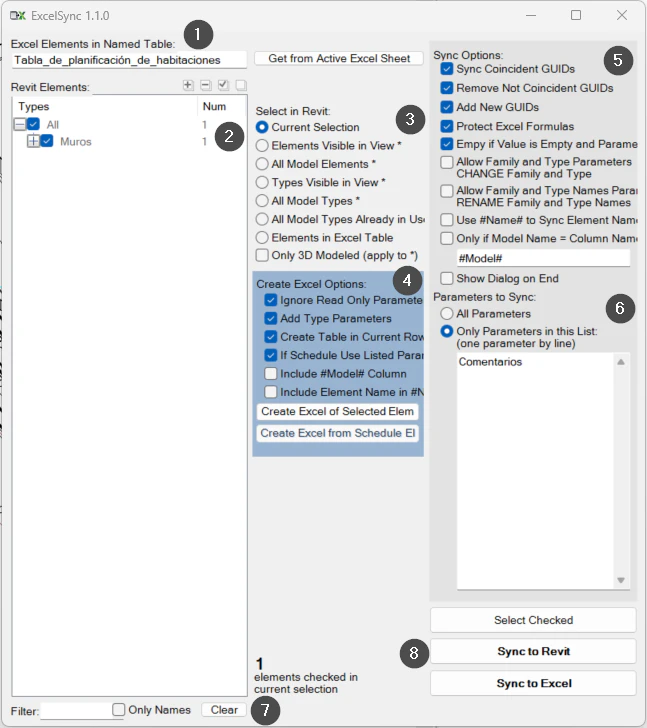
On screen
The ExcelSync window.
- 1Excel table to sync with.
- 2Revit elements detected.
- 3Which Revit elements are used.
- 4Creating the Excel table.
- 5Sync options.
- 6Parameters synchronised.
- 7Selection count.
- 8Actions: select, Sync to Revit, Sync to Excel.
Screenshot from the user guide, which comes with the licence.
A use case
Export the wall types to Excel, fill in their description and code in the sheet and send the changes back to the model.
More tools
3.0More data tools from the same group.
- ParameterJoinConcatenates parameters and free text within the selected elements. Part of WBTools.
- ParameterSetValueAssigns the value of a specific parameter to the active selection. Part of WBTools.
- RoomToParameterCopies the name, number or another parameter of a room to the elements it contains. Part of WBTools.
- SyncScheduleExports schedules to Excel, keeping each parameter exactly as displayed in the Excel document. Part of WBTools.
- CopyFromHostCopies the value of a parameter from the host to the hosted element. Part of WBTools.
Want it for your team?