
Juan Osborne
Chief Technology Officer
At WiseBuild we have our own view cropping tool for Revit, similar to the classic ones available as add-ins, but with one particular feature that, for us, multiplies its usefulness.
As is our tradition, we have given it a compound name that tries to be self-explanatory, with the first word hinting at what it is about: in this case “ViewCropper”. For me, it is the spanner of view cropping in Revit.
Its main features:
- It sets a view's Crop and Section Box from the selected elements, including elements in linked models.
- We can store the Crop and the Section Box and apply them to other views. And, here is the clever part, they are interchangeable.
- It can easily expand and shrink both the Crop and the Section Box.
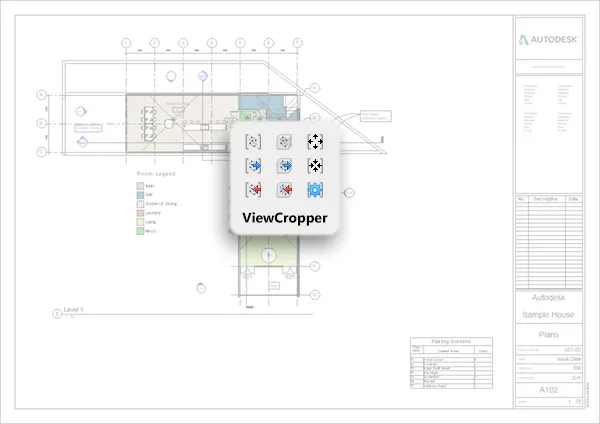
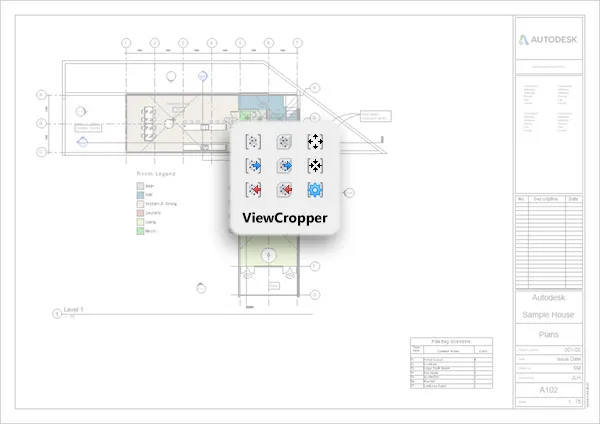
Once installed, you will find these 9 small icons under the WiseBuild tab. Here is a brief description of what each one does.
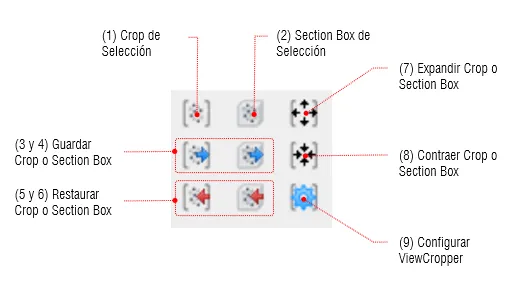
(1) Fits the view's Crop to the selected elements.
- If one of the selected elements is a linked model, you will be asked to select elements within the link to crop to. If nothing is selected in this second step, the whole linked model is used.
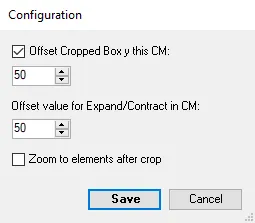
- If the option is enabled, the Crop is enlarged by the amount specified under the settings button (9).
(2) Fits the Section Box to the selected elements.
- As before, if one of the selected elements is a linked model, you will be asked to select elements within the link to use when calculating the Section Box. If nothing is selected in this second step, the whole linked model is used.
- If the option is enabled, the Section Box is enlarged by the amount specified under the settings button (9).
- If we are in a 2D view, it asks for the target 3D view, which can be fixed for subsequent runs. We can force it to ask for the target 3D view again by holding Shift while clicking the icon.
(3 and 4) Store the Crop or the Section Box temporarily in memory. We describe them together because both buttons store the dimensions in the same place. This means a single ‘box’ is stored, whether it is a Crop or a Section Box. For ViewCropper they are the same thing.
(5 and 6) Restore the Crop or the Section Box from the last “box” stored. This lets us ‘convert’ the Crop of a 2D view into the section box of a 3D view and vice versa. ViewCropper does its best to recover the dimensional properties and adjusts the views to cover the extent of the stored box, even if their orientation differs. Revit has a native option from the ViewCube, but it only works one way, and in large projects selecting views can be a nightmare.
(7) Expand the Crop or the Section Box.
- By default, it is the Crop in a 2D view and the Section Box in a 3D view, but we can force it to use the Crop by holding Shift.
- It expands by the amount set in the settings (9), but we can double it by holding Ctrl while clicking the icon.
(8) Shrink the Crop or the Section Box.
- By default, it is the Crop in a 2D view and the Section Box in a 3D view, but we can force it to use the Crop by holding Shift.
- It shrinks by the amount set in the settings (9), but we can double it by holding Ctrl while clicking the icon.
(9) Settings and Options. Here we can choose the dimensions and options available in ViewCropper.
You can download the installer to try the app from this link (2018 to 2022). As always, for non-commercial use only.
WBTools_ViewCropper.zip (1.2MB)
We have also put together a short demo video of the different options.