
Juan Osborne
Chief Technology Officer
Today we are going to talk about a small WiseBuild utility that can make life easier when placing views on sheets, undoubtedly one of the least rewarding tasks in Revit. It is called SheetComposer.
At WB we came up with the idea of a tool that would let views ‘place themselves’ on a sheet. The idea is to give views and schedules a bit of intelligence by adding a text parameter with a metalanguage that says where they should go on the sheet… A metalanguage? Don't panic: let's first look at what the tool does in practice and then we will dig into how it works. It may look complex, but I promise it is actually quite simple.
In the following example video you can see how it positions things automatically:
As you can see, if we change the sheet dimensions, or the size of the schedule or the view, we just need to run SheetComposer again and the position of the elements is corrected.
- The plan view is placed 80mm from the left and top edges of the sheet.
- The schedule is placed 50mm from the bottom edge of the sheet and 150mm from the right edge.
If you set up an overall sheet layout strategy, this positioning can be built into the view templates, so that 90% of the project's sheet layout is under control. And it can be adjusted globally with a few changes to the templates.
Right, let's look under the bonnet. The parameter that controls how views are positioned can be created on the fly as a project parameter: it must be a text parameter named SheetComposer. It does not need to be shared; just make sure it is assigned to views and schedules.
The parameter holds a series of codes whose purpose is to make two points coincide, one on the sheet and one in the view. They are two joined blocks of text that determine how to choose and measure the coordination point, and SheetComposer interprets them accordingly.
It is easier to look at a couple of examples with images of this position coordination.
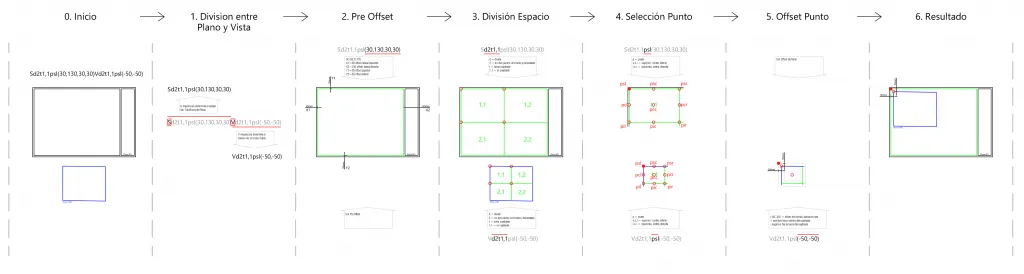
Sd2t1,1psl(30,130,30,30)Vd2t1,1psl(-50,-50)
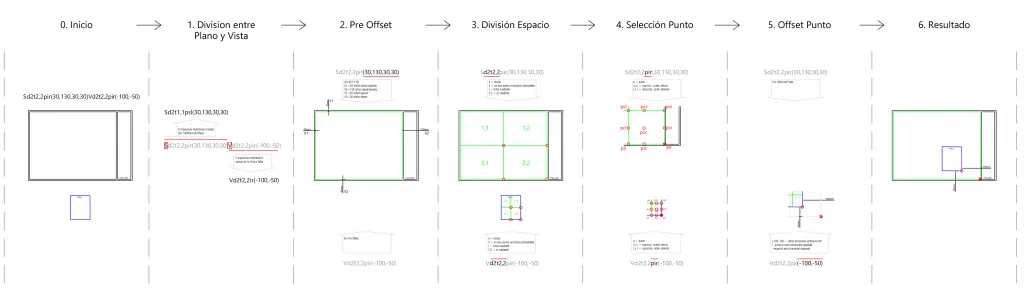
Sd2t2,2pir(30,130,30,30)Vd2t2,2pir(-100,-50)
It may seem a little complex, but bear in mind that the codes are reusable and you will most likely only need to define them once.
Note that for views the reference for distances is the crop region, so it must be enabled. Annotation elements, such as grids, are not taken into account when calculating distances.
At the end of this post you will find a description of the different fields in the text.
The best part? Saying goodbye to those unbearable guide grids.
You can download the beta version from this link. Compatible with Revit 2019 to 2021. It will appear in a new tab called WiseBuild. Free for non-commercial use.
WBTools_SheetComposer.zip (1.2MB)
Description of the metalanguage and steps: running this add-in with a sheet open automatically places every view and schedule that has placement instructions stored in the SheetComposer parameter. To do this we need to: 1- Add a project parameter called SheetComposer, of type text, assigned to views and schedules. 2- Enter the placement or alignment instructions in the views or schedules using the SheetComposer metalanguage, described below. 3- Run SheetComposer with the sheet open. The views and schedules should align automatically. The sheet does not move, only the views and schedules. Description of the metalanguage: essentially, two points are coordinated, one on the sheet and one in the view or schedule. For both points, SheetComposer processes the information stored in the SheetComposer parameter of the view or schedule. Example of the parameter structure: Sd2t1,1psl(30,130,30,30) Vd2t1,1psl(-50,-50) 1- The full text is split into two blocks, which must be separated by a capital S (for sheet) and a capital V (for view). Each of these two parts defines the position of the alignment point between sheet and view. Here we have Sd2t1,1psl(30,130,30,30) for the sheet and Vd2t1,1psl(-50,-50) for the view. Both blocks are processed in the same way to define the alignment point, following the steps explained below. As an initial internal step, SheetComposer calculates the four points that define the position of both the view and the sheet: their outline or frame and its coordinates. The view must have its crop box enabled, since the calculations are based on that crop box, excluding annotation elements such as grids or levels. 2- Pre-offset. In the example (30,130,30,30), four numbers that enlarge or reduce the initial frame. The format is (x1,x2,y1,y2) and the units are millimetres: x1 is the left side, x2 the right, y1 the top and y2 the bottom. Positive values point into the frame, negative values outwards. The pre-offset is meant to indicate the actual free space on a sheet. 3- Special division. In the example d2t1,1psl. A grid of two columns and two rows is created (d2) and cell 1,1 is selected (t1,1). This allows the space to be divided properly to compose the different views or schedules on the sheet. 4- Alignment point selection. In the example psl. Choose one of the nine possible points of the cell set in the previous step. That point is the alignment point we are defining. The format for selecting the point is (p = point), (s,c,i = top (superior), centre, bottom (inferior)), (l,c,r = left, center, right). 5- Point offset. In the example (-50,-50). An offset based on two values (x, y) in millimetres is applied to the selected point. Positive values point into the frame, negative values outwards. Once both alignment points have been determined, SheetComposer moves the view so that the two points coincide. Notes: you do not need to define every field. If a field is missing, SheetComposer uses the default values. The order of the parameters can be changed freely; just keep upper and lower case as in the example. Remember to enable the crop box in your views! The alignment point is based on the crop box. And remember that annotation elements are not taken into account in the alignment or in calculating the coordination point.